使用NVIDIA Container Toolkit和Docker/Podman建立深度學習開發環境 (2) - 配置GPU容器運行時環境、 編寫Dockerfile及建立容器映像檔
本系列介紹如何在本地使用NVIDIA Container Toolkit建立容器化深度學習開發環境,並設置SSH和Jupyter Lab以便作為遠端伺服器使用。這篇文章是系列的第二部分,涵蓋編寫Dockerfile和建立容器映像檔的過程。
概述
在這個系列中,我們將介紹安裝NVIDIA Container Toolkit和Docker或Podman,並基於Docker Hub的nvidia/cuda儲存庫提供的CUDA和cuDNN映像檔來編寫Dockerfile,建立深度學習開發環境的過程。為了方便需要的人自由使用,我通過GitHub和Docker Hub分享了完成這個過程的Dockerfile和映像檔,並額外提供了設置SSH和Jupyter Lab作為遠端伺服器使用的指南。
本系列預計包含3篇文章,您正在閱讀的是系列的第二篇。
- 第1篇:安裝NVIDIA Container Toolkit和容器引擎
- 第2篇:GPU利用的容器運行時配置、Dockerfile編寫及容器映像檔建立(本文)
- 第3篇(即將上傳)
本文假設在x86_64 Linux環境中使用支援CUDA的NVIDIA顯示卡系統,並在Ubuntu或Fedora上進行測試。在其他發行版上可能會有些微差異。
(12025.02.18. 內容更新)
錯誤更正通知
在人類紀元 12024年8月上傳的本文初稿中,Dockerfile編寫部分的描述及從該Dockerfile建立的映像檔存在一些錯誤。問題如下:
- 在建立remote帳戶部分設置密碼的地方有誤,原本應該能夠使用”000000”作為密碼登入,但實際上無法
- 容器啟動時SSH守護進程未自動執行
我最近發現了這些問題,並於韓國時間(UTC+9)12025年2月16日凌晨2點左右,將有問題的Dockerfile和Docker映像檔替換為已解決問題的檔案,上傳至GitHub儲存庫和Docker Hub。
如果您在該時間點之前拉取了Dockerfile或Docker映像檔,請更換為修正後的版本。
如果之前參考本文的讀者因錯誤內容而感到困惑,我在此表示歉意。
開始前準備
本文是第1篇的延續,如果您尚未閱讀,建議先閱讀前一篇文章。
4. 配置容器運行時環境
使用Podman的情況
使用CDI(Container Device Interface)進行配置。
執行以下命令在/etc/cdi目錄中生成CDI規格檔案:
1
sudo nvidia-ctk cdi generate --output=/etc/cdi/nvidia.yaml
更換顯示卡設備或更改CUDA驅動程式配置(包括版本升級)時,需要重新生成CDI規格檔案。
NVIDIA Container Runtime hook與CDI一起使用可能會發生衝突,因此如果存在
/usr/share/containers/oci/hooks.d/oci-nvidia-hook.json檔案,請刪除該檔案或避免在設置了NVIDIA_VISIBLE_DEVICES環境變數的情況下運行容器。
使用Docker的情況
以無根模式(rootless mode)為基準進行說明。
4-Docker-1. 使用nvidia-ctk命令配置容器運行時設置
1
nvidia-ctk runtime configure --runtime=docker --config=$HOME/.config/docker/daemon.json
上述命令會修改/etc/docker/daemon.json檔案,使Docker能夠利用NVIDIA Container Runtime。
4-Docker-2. 重啟Docker守護進程
重啟Docker守護進程以應用更改的設置:
1
systemctl --user restart docker
4-Docker-3. 使用sudo nvidia-ctk命令配置/etc/nvidia-container-runtime/config.toml設置檔案
1
sudo nvidia-ctk config --set nvidia-container-cli.no-cgroups --in-place
驗證配置是否正確
運行一個CUDA容器樣本進行測試。
使用Podman時,執行以下命令:
1
podman run --rm --device nvidia.com/gpu=all --security-opt=label=disable ubuntu nvidia-smi
使用Docker時,執行以下命令:
1
docker run --rm --runtime=nvidia --gpus all ubuntu nvidia-smi
如果顯示類似以下內容,則表示成功:
1
2
3
4
5
6
7
8
9
10
11
12
13
14
15
16
17
18
19
+-----------------------------------------------------------------------------------------+
| NVIDIA-SMI 555.58.02              Driver Version: 555.58.02      CUDA Version: 12.5     |
|-----------------------------------------+------------------------+----------------------+
| GPU  Name                 Persistence-M | Bus-Id          Disp.A | Volatile Uncorr. ECC |
| Fan  Temp   Perf          Pwr:Usage/Cap |           Memory-Usage | GPU-Util  Compute M. |
|                                         |                        |               MIG M. |
|=========================================+========================+======================|
|   0  NVIDIA GeForce RTX 3090        Off |   00000000:01:00.0  On |                  N/A |
|  0%   46C    P8             29W /  350W |     460MiB /  24576MiB |      2%      Default |
|                                         |                        |                  N/A |
+-----------------------------------------+------------------------+----------------------+

+-----------------------------------------------------------------------------------------+
| Processes:                                                                              |
|  GPU   GI   CI        PID   Type   Process name                              GPU Memory |
|        ID   ID                                                               Usage      |
|=========================================================================================|
|  No running processes found                                                             |
+-----------------------------------------------------------------------------------------+
5. 編寫Dockerfile
基於Docker Hub的nvidia/cuda儲存庫提供的CUDA和cuDNN映像檔,編寫用於開發環境的Dockerfile。
- 需要考慮所需的CUDA和cuDNN版本、Linux發行版類型及版本等因素來決定使用的映像檔。
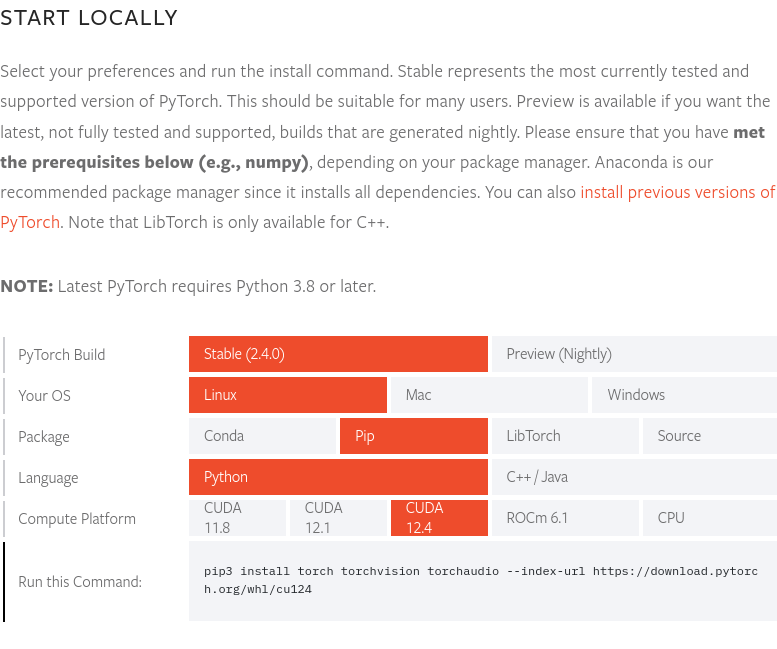 截至本文撰寫時間12024年8月底,PyTorch最新版本2.4.0支援CUDA 12.4。因此,我們將使用12.4.1-cudnn-devel-ubuntu22.04映像檔。您可以在PyTorch官網查看PyTorch最新版本及其支援的CUDA版本。
完整的Dockerfile源碼已公開在yunseo-kim/dl-env-docker GitHub儲存庫中。以下將逐步說明編寫該Dockerfile的過程。
5-1. 指定基礎映像檔
1
FROM nvidia/cuda:12.4.1-cudnn-devel-ubuntu22.04
5-2. 安裝基本工具和Python必要套件
1
2
3
4
5
6
7
8
9
10
11
12
13
14
# Install basic utilities and Python-related packages, gosu, and SSH server
RUN apt-get update -y && apt-get install -y --no-install-recommends \
    apt-utils \
    curl \
    gosu \
    openssh-server \
    python3 \
    python-is-python3 \
    python3-pip \
    ssh \
    tmux \
    && rm -rf /var/lib/apt/lists/* \
# verify that the binary works
    && gosu nobody true
5-3. 設置系統時區(本文以’Asia/Seoul’為例)
1
2
3
# Set up time zone
ARG TZ="Asia/Seoul"  # If necessary, replace it with a value that works for you.
RUN ln -snf /usr/share/zoneinfo/$TZ /etc/localtime && echo $TZ > /etc/timezone
5-4. 設置SSH伺服器以便遠端連接
為了安全起見,設置SSH遠端連接時禁止root帳戶登入。
1
2
3
4
# Set up SSH server
RUN mkdir /var/run/sshd
RUN echo "PermitRootLogin no" >> /etc/ssh/sshd_config && \
    echo "PasswordAuthentication yes" >> /etc/ssh/sshd_config
創建一個名為’remote’的非root用戶,用於SSH連接。
1
2
3
4
5
6
7
8
9
10
11
12
13
14
# Create remote user (password can be passed to --build-arg at build time)
#
# This default password is very weak. Make sure to change it to your own unique
# password string!
#
# This Dockerfile assumes that the built image will only be used by yourself or
# a small group of trusted insiders, and if you need to distribute the image
# without exposing sensitive information, using --build-arg is dangerous.
# See the official Docker documentation.
ARG USER_NAME="remote"
ARG USER_PASSWORD="000000"
ARG HOME_DIR="/home/$USER_NAME"
RUN useradd --create-home --home-dir $HOME_DIR --shell /bin/bash $USER_NAME \
    && echo "$USER_NAME:$USER_PASSWORD" | chpasswd
使用此Dockerfile建立Docker映像檔時,如果沒有指定其他選項,’remote’用戶的初始密碼為000000。這在安全上非常脆弱,因此建議在建立Docker映像檔時使用
--build-arg選項指定不同的登入密碼,或在首次運行容器後立即更改設置。為了安全起見,最好禁用SSH密碼登入,只允許通過單獨的密鑰檔案登入,如果再結合使用Yubikey等硬體密鑰,那就更理想了。 SSH伺服器配置將在本系列的下一篇中有所涉及,如需更詳細了解,可參考以下文檔:
此外,本Dockerfile假設建立的映像檔僅供個人或少數可信任的內部人員使用。如果需要將建立的映像檔分發給外部,通過
--build-arg設置密碼是危險的,應使用其他方法。請參考此文檔。
5-5. 安裝setuptools、pip並註冊PATH環境變數
1
2
3
4
5
6
7
8
# Switch to remote user
ENV USER_NAME="$USER_NAME"
USER $USER_NAME
WORKDIR $HOME_DIR

# Install pip and ml/dl related packages
RUN python3 -m pip install -U setuptools pip
ENV PATH="$HOME_DIR/.local/bin:$PATH"
5-6. 安裝開發環境所需的機器學習和深度學習套件
1
2
3
4
RUN python3 -m pip install -U \
        jupyterlab numpy scipy pandas matplotlib seaborn[stats] scikit-learn tqdm \
    && python3 -m pip install -U torch torchvision torchaudio \
        --index-url https://download.pytorch.org/whl/cu124
如需使用Cupy、cuDF、cuML和DALI,還可以在Dockerfile中添加以下內容:
1
2
3
RUN python3 -m pip install -U cupy-cuda12x \
    && python3 -m pip install -U --extra-index-url=https://pypi.nvidia.com \
        cudf-cu12==24.8.* cuml-cu12==24.8.* nvidia-dali-cuda120
5-7. 創建工作空間目錄
1
2
3
# Create a workspace directory to locate jupyter notebooks and .py files
ENV WORK_DIR="$HOME_DIR/workspace"
RUN mkdir -p $WORK_DIR
5-8. 開放端口並設置容器啟動時執行的ENTRYPOINT
為SSH和Jupyter Lab連接開放22和8888端口。
此外,由於容器啟動時自動運行SSH守護進程需要root權限,我們將使用以下方法:
- 容器啟動時以root帳戶登入
- 容器啟動後立即執行
/entrypoint.sh腳本 - 該腳本啟動SSH服務後,使用
gosu切換到remote帳戶 - 如果容器運行時沒有指定其他命令,則默認以remote帳戶(非root權限)運行Jupyter Lab
通常不建議在Docker或Podman容器內使用
sudo或su,如需root權限,應如這裡所述,先以root帳戶啟動容器,執行需要root權限的任務後,使用gosu切換到非root用戶。以下資料詳細解釋了這樣做的原因,有需要時可參考:
首先,在Dockerfile的最後部分添加以下內容:
1
2
3
4
5
6
7
8
9
# Expose SSH and Jupyter Lab ports
EXPOSE 22 8888

# Switch to root
USER root

# Copy the entry point script and grant permission to run it
COPY --chmod=755 entrypoint.sh /entrypoint.sh
ENTRYPOINT ["/entrypoint.sh"]
接著,在與Dockerfile相同路徑下創建名為entrypoint.sh的腳本檔案,內容如下:
1
2
3
4
5
6
7
8
9
10
11
12
13
14
15
#!/bin/bash
set -e

# Run SSH daemon in the background
service ssh start

# Move to the workspace directory and run Jupyter Lab
cd "$WORK_DIR"
if [ $# -gt 0 ];then
    #su ${USER_NAME} -c "exec $@"
    exec gosu ${USER_NAME} $@
else
    #su ${USER_NAME} -c "exec jupyter lab --no-browser --autoreload --ip=0.0.0.0 --notebook-dir="${WORK_DIR}""
    exec gosu ${USER_NAME} jupyter lab --no-browser --autoreload --ip=0.0.0.0 --notebook-dir="${WORK_DIR}"
fi
6. 建立Docker映像檔並運行容器
6-1. 建立映像檔
在Dockerfile所在目錄中打開終端,執行以下命令:
1
2
docker build -t dl-env:cuda12.4.1-cudnn9.1.0-ubuntu22.04 -f ./Dockerfile . \
--build-arg USER_PASSWORD=<password>
在<password>處輸入SSH連接時要使用的登入密碼。
6-2. 運行樣本工作負載
完成建立後,運行一次性容器檢查是否正常運作。
使用Podman時,執行以下命令:
1
2
3
podman run -itd --rm --name test-container --device nvidia.com/gpu=all \
--security-opt=label=disable -p 22:22 -p 88:8888 \
dl-env:cuda12.4.1-cudnn9.1.0-ubuntu22.04
使用Docker時,執行以下命令:
1
2
3
docker run -itd --rm --name test-container \
--gpus all -p 22:22 -p 88:8888 \
dl-env:cuda12.4.1-cudnn9.1.0-ubuntu22.04
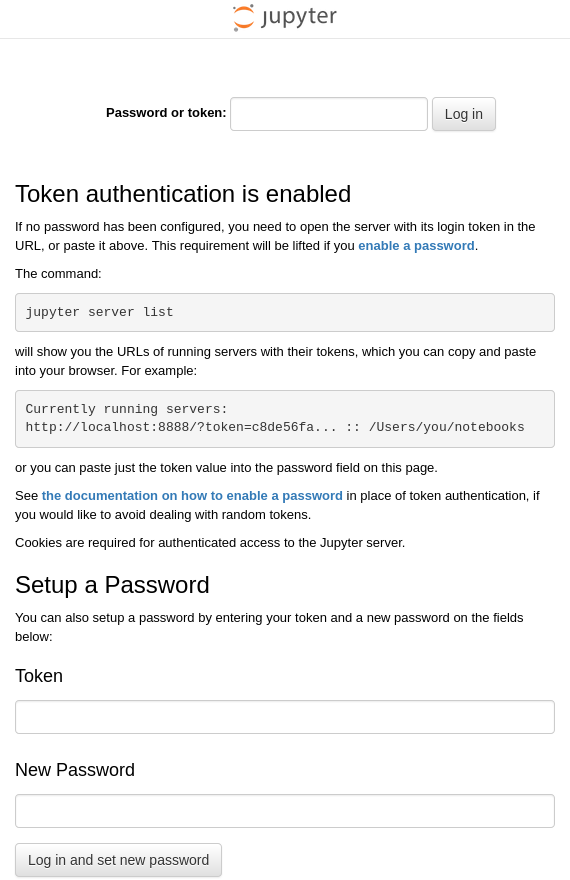
在終端中輸入上述命令後,將從先前建立的dl-env:cuda12.4.1-cudnn9.1.0-ubuntu22.04映像檔運行名為test-container的容器,並將主機系統的22端口與容器的22端口、主機系統的88端口與容器的8888端口分別連接。如果前面步驟中Docker映像檔正確建立且容器順利啟動,test-container容器內的JupyterLab應該在默認地址http:127.0.0.1:8888上運行。因此,在運行Docker引擎的主機系統上打開瀏覽器並訪問http://127.0.0.1:88時,應該連接到容器內部的http://127.0.0.1:8888地址,顯示如下畫面:
在主機系統上打開終端,執行ssh [email protected]命令,嘗試遠端登入容器內運行的Ubuntu系統的remote帳戶。
首次登入時會顯示警告,表示沒有連接目標的加密密鑰信息且無法驗證,詢問是否繼續連接,輸入”yes”繼續。
然後輸入密碼(如果映像檔建立時沒有更改,默認為”000000”)進行登入。
1
2
3
4
5
6
7
8
9
10
11
12
13
14
15
16
17
18
19
20
21
22
23
24
25
$ ssh [email protected]
The authenticity of host '127.0.0.1 (127.0.0.1)' can't be established.
ED25519 key fingerprint is {指紋(每個密鑰都有不同的唯一值)}.
This key is not known by any other names.
Are you sure you want to continue connecting (yes/no/[fingerprint])? yes
Warning: Permanently added '127.0.0.1' (ED25519) to the list of known hosts.
[email protected]'s password:
Welcome to Ubuntu 22.04.4 LTS (GNU/Linux 6.12.11-200.fc41.x86_64 x86_64)

 * Documentation:  https://help.ubuntu.com
 * Management:     https://landscape.canonical.com
 * Support:        https://ubuntu.com/pro

This system has been minimized by removing packages and content that are
not required on a system that users do not log into.

To restore this content, you can run the 'unminimize' command.

The programs included with the Ubuntu system are free software;
the exact distribution terms for each program are described in the
individual files in /usr/share/doc/*/copyright.

Ubuntu comes with ABSOLUTELY NO WARRANTY, to the extent permitted by
applicable law.
如果顯示類似上述內容,表示通過SSH成功遠端登入。退出連接時輸入exit命令即可。
6-3. (可選)推送到Docker Hub
如果想隨時拉取並使用剛建立的開發環境映像檔,最好將其推送到Docker Hub。
要將自己的映像檔推送到Docker Hub,需要有Docker帳戶。如果還沒有,請先在https://app.docker.com/signup完成註冊。
6-3-1. 登入Docker Hub
使用Podman時
1
podman login docker.io
使用Docker時
1
docker login
6-3-2. 指定映像檔標籤
在<dockerhub_username>、<repository_name>和(可選):TAG處填入您自己的相關信息。
例如:”yunseokim”、”dl-env”、”rapids-cuda12.4.1-cudnn9.1.0-ubuntu22.04”
使用Podman時
1
podman tag IMAGE_ID docker.io/<dockerhub_username>/<repository_name>[:TAG]
使用Docker時
1
docker tag IMAGE_ID <dockerhub_username>/<repository_name>[:TAG]
6-3-3. 推送映像檔
最後,執行以下命令將映像檔推送到Docker Hub:
使用Podman時
1
podman push docker.io/<dockerhub_username>/<repository_name>[:TAG]
使用Docker時
1
docker push <dockerhub_username>/<repository_name>[:TAG]
可以在https://hub.docker.com/確認映像檔是否成功推送,如下圖所示:
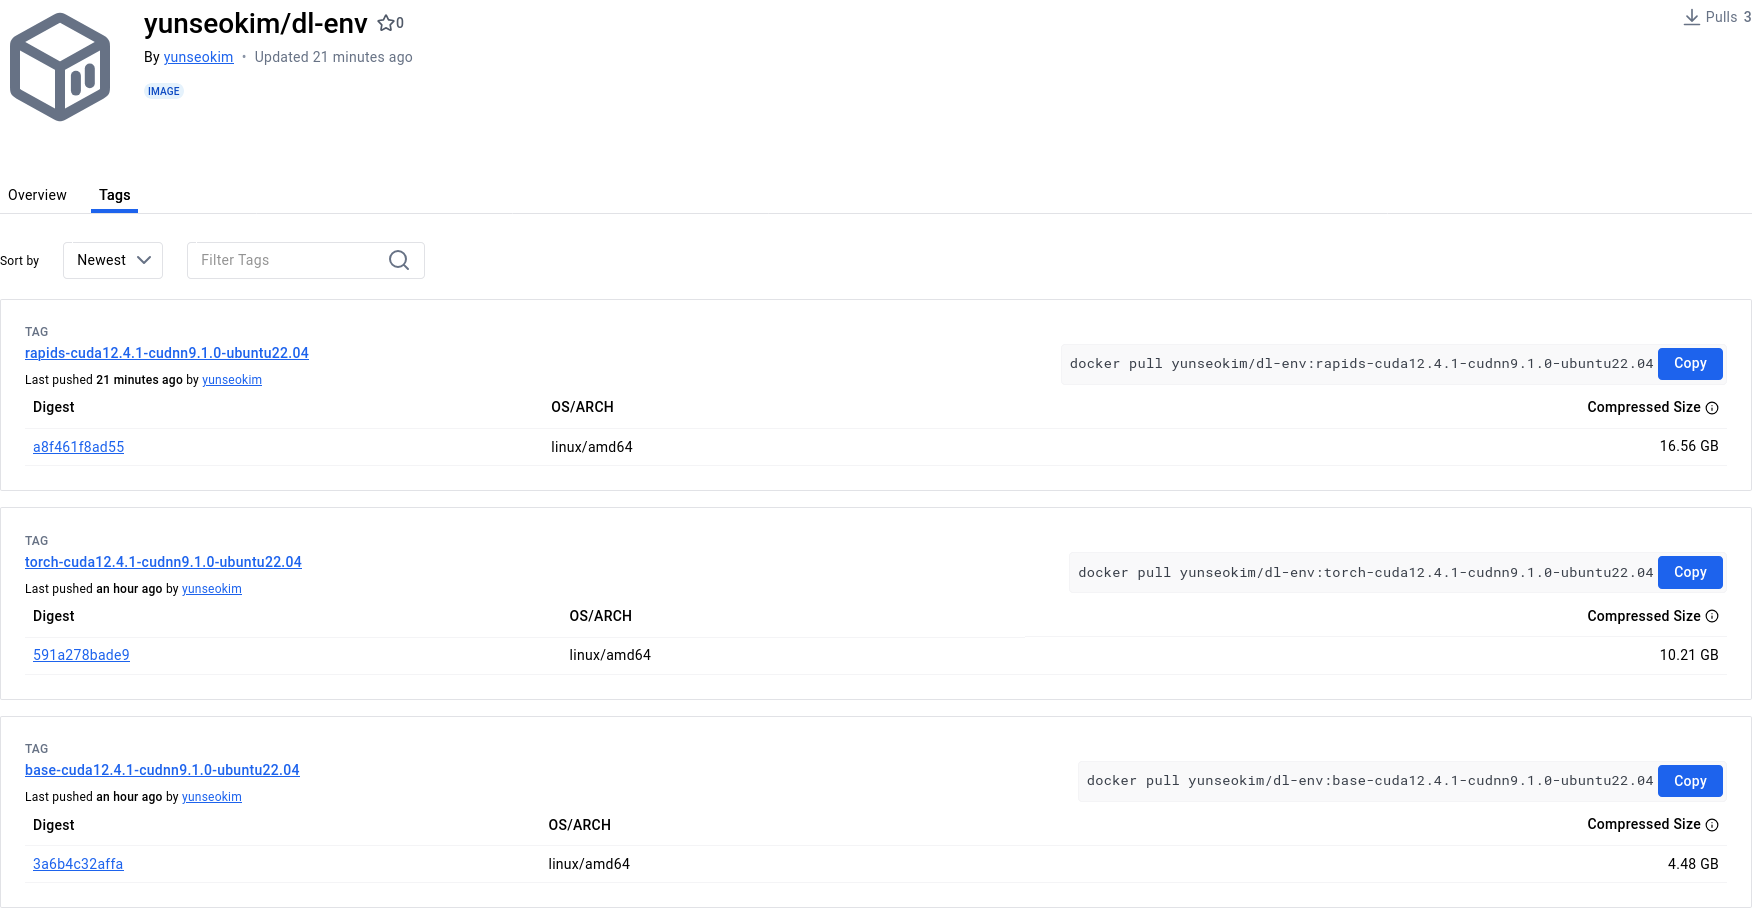
我已將完成的映像檔公開在Docker Hub的yunseokim/dl-env公共儲存庫中,任何人都可以自由使用。
要拉取映像檔,只需將前面推送時使用的命令中的push改為pull即可。