如何使用Claude 3.5 Sonnet API自動翻譯文章 (2) - 編寫和應用自動化腳本
本文介紹如何設計用於多語言翻譯Markdown文本文件的提示詞,以及如何使用從Anthropic獲得的API密鑰和設計的提示詞,通過Python實現工作自動化的過程。這是該系列的第二篇文章,介紹了API的獲取和連接以及Python腳本的編寫方法。

前言
最近,我引入了Anthropic的Claude 3.5 Sonnet API來實現博客文章的多語言翻譯。在這個系列中,我將介紹選擇Claude 3.5 Sonnet API的原因、提示詞設計方法,以及如何通過Python腳本實現API連接和自動化。 這個系列由兩篇文章組成,您正在閱讀的是該系列的第二篇文章。
- 第一篇: Claude 3.5 Sonnet模型介紹及選擇理由、提示詞工程
- 第二篇: 使用API編寫和應用Python自動化腳本 (本文)
開始之前
本文是第1篇的延續,如果您還沒有閱讀,建議先閱讀前一篇文章。
Claude API連接
獲取Claude API密鑰
這裡介紹如何獲取新的Claude API密鑰。如果您已經有可用的API密鑰,可以跳過這一步。
訪問https://console.anthropic.com並登錄。如果您還沒有帳戶,需要先註冊。登錄後,您將看到如下所示的儀表板畫面。

在該畫面上點擊”Get API keys”按鈕,您將看到如下畫面。
 我已經創建了一個密鑰,所以顯示了名為
yunseo-secret-key的密鑰,但如果您是第一次創建帳戶並且還沒有獲取API密鑰,可能不會看到任何密鑰。點擊右上角的”Create Key”按鈕即可獲取新的密鑰。
完成密鑰獲取後,畫面上會顯示您的API密鑰,該密鑰之後將無法再次查看,因此務必將其安全地記錄在別處。
(建議) 將Claude API密鑰註冊為環境變量
要在Python或Shell腳本中使用Claude API,需要讀取API密鑰。雖然可以直接在腳本中記錄API密鑰,但如果需要上傳到GitHub或以其他方式與他人共享腳本,就不能使用這種方法。此外,即使沒有計劃共享腳本文件,也可能因意外錯誤導致腳本文件洩露,如果腳本文件中記錄了API密鑰,就有可能發生API密鑰一同洩露的事故。因此,建議將API密鑰註冊為僅供個人使用的系統環境變量,然後在腳本中讀取該環境變量。以下介紹在UNIX系統中將API密鑰註冊為系統環境變量的方法。對於Windows系統,請參考網上的其他文章。
- 在終端中,根據您使用的shell類型,輸入
nano ~/.bashrc或nano ~/.zshrc來啟動編輯器。 - 在文件內容中添加
export ANTHROPIC_API_KEY='your-api-key-here'。將’your-api-key-here’替換為您的API密鑰,注意必須用單引號將其括起來。 - 保存更改並退出編輯器。
- 在終端中執行
source ~/.bashrc或source ~/.zshrc以應用更改。
安裝所需的Python包
如果您的Python環境中尚未安裝anthropic包,請使用以下命令安裝:
1
pip3 install anthropic
此外,以下包也是後面介紹的文章翻譯腳本所需的,請使用以下命令安裝或更新:
1
pip3 install -U argparse tqdm
編寫Python腳本
本文介紹的文章翻譯腳本由以下3個Python腳本文件和1個CSV文件組成:
compare_hash.py: 計算_posts/ko目錄中韓語原文文章的SHA256哈希值,然後與hash.csv文件中記錄的現有哈希值進行比較,返回已更改或新添加的文件名列表hash.csv: 記錄現有文章文件SHA256哈希值的CSV文件prompt.py: 接收filepath、source_lang、target_lang值,從系統環境變量中讀取Claude API密鑰值,然後調用API,將之前編寫的提示詞作為系統提示詞,將”filepath”中要翻譯的文章內容作為用戶提示詞提交。然後從Claude 3.5 Sonnet模型接收響應(翻譯結果),並將其作為文本文件輸出到'../_posts/' + language_code[target_lang] + '/' + filename路徑translate_changes.py: 包含source_lang字符串變量和’target_langs’列表變量,調用compare_hash.py中的changed_files()函數以返回changed_files列表變量。如果有更改的文件,則對changed_files列表中的所有文件和target_langs列表中的所有元素執行雙重循環,在該循環中調用prompt.py中的translate(filepath, source_lang, target_lang)函數執行翻譯任務。
完成的腳本文件內容也可以在GitHub的yunseo-kim/yunseo-kim.github.io存儲庫中查看。
compare_hash.py
1
2
3
4
5
6
7
8
9
10
11
12
13
14
15
16
17
18
19
20
21
22
23
24
25
26
27
28
29
30
31
32
33
34
35
36
37
38
39
40
41
42
43
44
45
46
47
48
49
50
51
52
53
54
55
56
57
58
59
60
61
62
63
64
65
66
67
68
69
70
71
72
73
import os
import hashlib
import csv

default_source_lang_code = "ko"

def compute_file_hash(file_path):
    sha256_hash = hashlib.sha256()
    with open(file_path, "rb") as f:
        for byte_block in iter(lambda: f.read(4096), b""):
            sha256_hash.update(byte_block)
    return sha256_hash.hexdigest()

def load_existing_hashes(csv_path):
    existing_hashes = {}
    if os.path.exists(csv_path):
        with open(csv_path, 'r') as csvfile:
            reader = csv.reader(csvfile)
            for row in reader:
                if len(row) == 2:
                    existing_hashes[row[0]] = row[1]
    return existing_hashes

def update_hash_csv(csv_path, file_hashes):
    # Sort the file hashes by filename (the dictionary keys)
    sorted_file_hashes = dict(sorted(file_hashes.items()))

    with open(csv_path, 'w', newline='') as csvfile:
        writer = csv.writer(csvfile)
        for file_path, hash_value in sorted_file_hashes.items():
            writer.writerow([file_path, hash_value])

def changed_files(source_lang_code):
    posts_dir = '../_posts/' + source_lang_code + '/'
    hash_csv_path = './hash.csv'

    existing_hashes = load_existing_hashes(hash_csv_path)
    current_hashes = {}
    changed_files = []

    for root, _, files in os.walk(posts_dir):
        for file in files:
            if not file.endswith('.md'):  # Process only .md files
                continue

            file_path = os.path.join(root, file)
            relative_path = os.path.relpath(file_path, start=posts_dir)

            current_hash = compute_file_hash(file_path)
            current_hashes[relative_path] = current_hash

            if relative_path in existing_hashes:
                if current_hash != existing_hashes[relative_path]:
                    changed_files.append(relative_path)
            else:
                changed_files.append(relative_path)

    update_hash_csv(hash_csv_path, current_hashes)
    return changed_files

if __name__ == "__main__":
    initial_wd = os.getcwd()
    os.chdir(os.path.abspath(os.path.dirname(__file__)))

    changed_files = changed_files(default_source_lang_code)
    if changed_files:
        print("Changed files:")
        for file in changed_files:
            print(f"- {file}")
    else:
        print("No files have changed.")

    os.chdir(initial_wd)
prompt.py
由於包含了之前編寫的提示詞內容,文件內容較長,因此用GitHub存儲庫中的源文件鏈接代替。
https://github.com/yunseo-kim/yunseo-kim.github.io/blob/main/tools/prompt.py
上述鏈接中的
prompt.py文件中的max_tokens是獨立於Context window大小指定最大輸出長度的變量。使用Claude API時,一次可以輸入的Context window大小為200k令牌(約68萬字左右),但每個模型支持的最大輸出令牌數是單獨指定的,因此建議在使用API之前先在Anthropic官方文檔中確認。原有的Claude 3系列模型最多可輸出4096個令牌,雖然在這個博客的大多數文章中沒有問題,但對於一些較長的文章(韓文約8000字以上),在某些輸出語言中超過4096個令牌,導致翻譯文本後部分被截斷的問題。Claude 3.5 Sonnet的最大輸出令牌數增加到了8192,是原來的兩倍,因此基本上不會出現超過這個最大輸出令牌數而產生問題的情況,上述GitHub存儲庫的prompt.py中也指定了max_tokens=8192。
translate_changes.py
1
2
3
4
5
6
7
8
9
10
11
12
13
14
15
16
17
18
19
20
21
22
23
24
25
26
27
28
29
30
31
32
33
34
35
36
37
38
39
40
41
42
43
44
45
46
47
48
49
50
51
52
import sys
import os
from tqdm import tqdm
import compare_hash
import prompt

def is_valid_file(filename):
    # 要排除的文件模式
    excluded_patterns = [
        '.DS_Store',  # macOS系統文件
        '~',          # 臨時文件
        '.tmp',       # 臨時文件
        '.temp',      # 臨時文件
        '.bak',       # 備份文件
        '.swp',       # vim臨時文件
        '.swo'        # vim臨時文件
    ]

    # 如果文件名包含任何排除模式,則返回False
    return not any(pattern in filename for pattern in excluded_patterns)

posts_dir = '../_posts/'
source_lang = "Korean"
target_langs = ["English", "Japanese", "Taiwanese Mandarin","Spanish", "Brazilian Portuguese", "French", "German"]
source_lang_code = "ko"
target_lang_codes = ["en", "ja", "zh-TW", "es", "pt-BR", "fr", "de"]

if __name__ == "__main__":
    initial_wd = os.getcwd()
    os.chdir(os.path.abspath(os.path.dirname(__file__)))

    changed_files = compare_hash.changed_files(source_lang_code)
    # 過濾臨時文件
    changed_files = [f for f in changed_files if is_valid_file(f)]

    if not changed_files:
        sys.exit("No files have changed.")
    print("Changed files:")
    for file in changed_files:
        print(f"- {file}")

    print("")
    print("*** Translation start! ***")
    # 外部循環:更改文件的進度
    for changed_file in tqdm(changed_files, desc="Files", position=0):
        filepath = os.path.join(posts_dir, source_lang_code, changed_file)
        # 內部循環:每個文件的語言翻譯進度
        for target_lang in tqdm(target_langs, desc="Languages", position=1, leave=False):
            prompt.translate(filepath, source_lang, target_lang)

    print("\nTranslation completed!")
    os.chdir(initial_wd)
Python腳本使用方法
以Jekyll博客為例,在存放文章的/_posts目錄下,按照ISO 639-1語言代碼創建子目錄,如/_posts/ko、/_posts/en、/_posts/pt-BR等。然後將上面介紹的Python腳本和CSV文件放在/tools目錄下,在該位置打開終端並執行以下命令:
1
python3 translate_changes.py
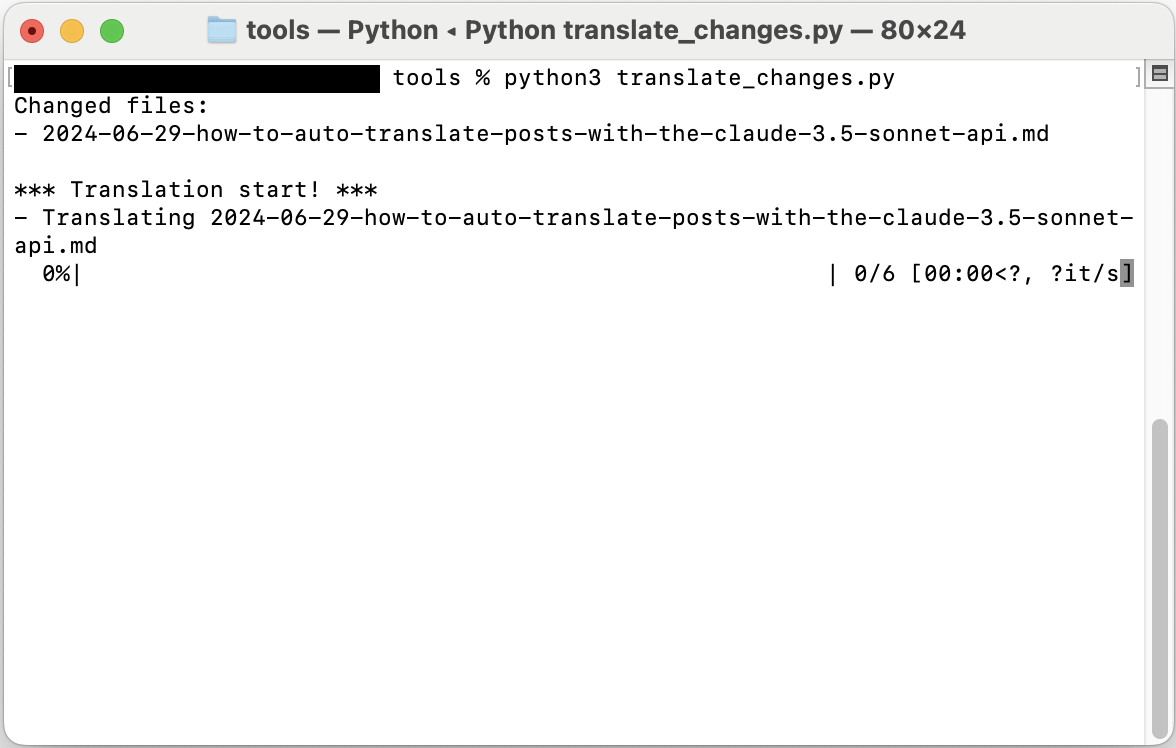
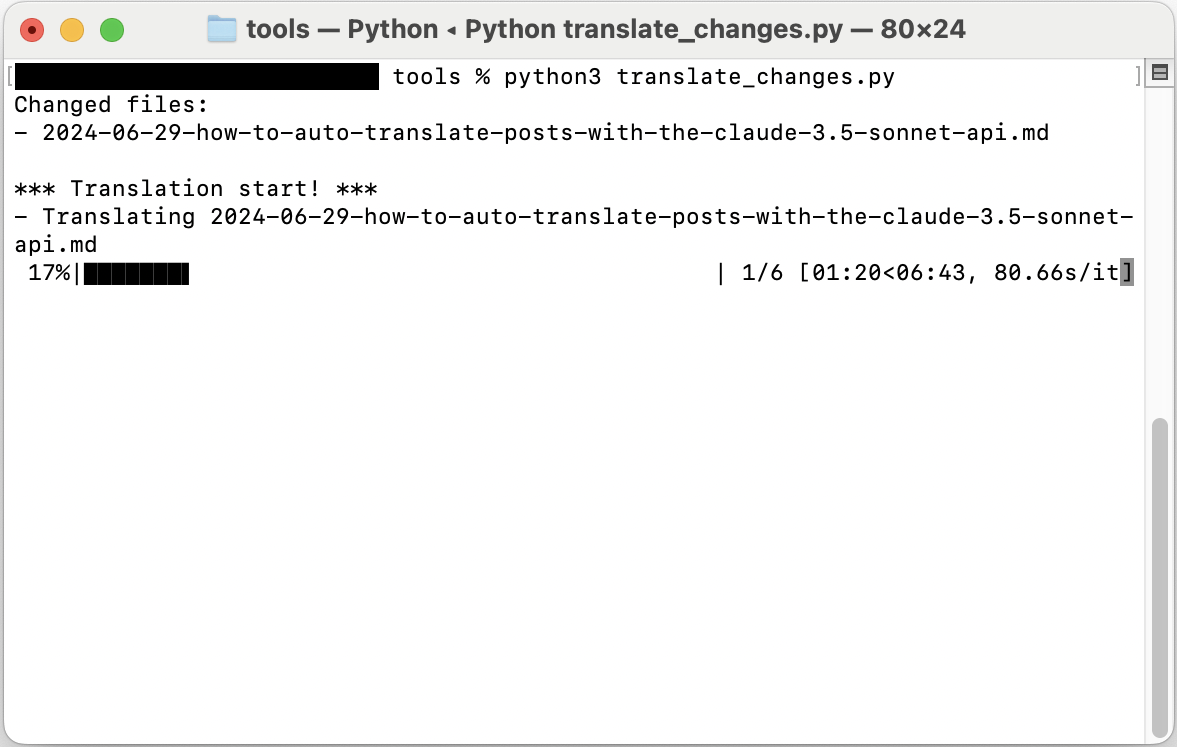
腳本執行後,將顯示如下畫面:
實際使用體驗
如上所述,我已經在這個博客上引入並使用Claude 3.5 API進行文章自動翻譯約2個月了。在大多數情況下,無需額外人工干預就能獲得高質量的翻譯文本,並且在將文章翻譯成多種語言並發布後,實際上確實觀察到來自巴西、加拿大、美國、法國等韓國以外地區的通過搜索產生的自然搜索流量。除了增加博客流量外,對於文章作者本人的學習方面也有額外的好處。由於Claude能夠生成相當流暢的英文文本,在將文章Push到GitHub Pages存儲庫之前進行審核時,可以藉此機會了解我寫的韓語原文中的特定術語或表達在英語中如何自然地表達。雖然僅憑這一點還不足以進行充分的英語學習,但能夠經常接觸到日常表達以及學術表達和術語的自然英文表達,而且是以我自己寫的、最熟悉的文章為例句,無需額外努力就能實現,這對於像韓國這樣的非英語國家的工科本科生來說,似乎也是一個相當不錯的優勢。