Building a Deep Learning Development Environment with NVIDIA Container Toolkit and Docker/Podman (2) - Configuring Container Runtime for GPU Utilization, Writing Dockerfile and Building Container Images
This series covers setting up a container-based deep learning development environment using NVIDIA Container Toolkit, and configuring SSH and Jupyter Lab for remote server use. This post is the second in the series, covering the process of writing a Dockerfile and building container images.
Overview
This series covers installing NVIDIA Container Toolkit with Docker or Podman, and building a deep learning development environment by writing a Dockerfile based on CUDA and cuDNN images provided by the nvidia/cuda repository on Docker Hub. For those who need it, I’m sharing the completed Dockerfile and image through GitHub and Docker Hub, along with a guide for SSH and Jupyter Lab setup for remote server use.
The series will consist of 3 posts, and this is the second post in the series.
- Part 1: Installing NVIDIA Container Toolkit & Container Engine
- Part 2: Configuring Container Runtime for GPU Utilization, Writing Dockerfile and Building Container Images (this post)
- Part 3 (upcoming)
This guide assumes an x86_64 Linux environment with an NVIDIA graphics card that supports CUDA. While I’ve tested this on Ubuntu and Fedora, there might be slight differences in some details for other distributions.
(Updated on 12025.02.18)
Error Correction Notice
In the initial version of this post uploaded in August 12024 of the Holocene calendar, there were some errors in the Writing Dockerfile section and in the image built from that Dockerfile. The issues were:
- The password setting for the remote account creation was incorrect, and users couldn’t log in with the password “000000” as intended
- The SSH daemon didn’t automatically start when the container was launched
I recently became aware of these issues and replaced the problematic Dockerfile and Docker images with corrected versions in the GitHub repository and on Docker Hub around 2 AM on February 16, 12025 (UTC+9).
If you pulled the Dockerfile or Docker images before this time, please replace them with the updated versions.
I apologize to anyone who experienced confusion due to the incorrect information.
Before Starting
This post continues from Part 1, so if you haven’t read it yet, I recommend reading the previous post first.
4. Configuring Container Runtime
For Podman Users
Configure using CDI (Container Device Interface).
Run the following command to generate CDI specification files in the /etc/cdi directory.
1
sudo nvidia-ctk cdi generate --output=/etc/cdi/nvidia.yaml
You need to regenerate the CDI specification file if you change your graphics card device or modify the CUDA driver configuration (including version upgrades).
Using NVIDIA Container Runtime hook with CDI may cause conflicts, so if
/usr/share/containers/oci/hooks.d/oci-nvidia-hook.jsonexists, delete the file or be careful not to run containers with theNVIDIA_VISIBLE_DEVICESenvironment variable set.
For Docker Users
This explanation is based on rootless mode.
4-Docker-1. Configure container runtime settings with nvidia-ctk command
1
nvidia-ctk runtime configure --runtime=docker --config=$HOME/.config/docker/daemon.json
This command modifies the /etc/docker/daemon.json file to allow Docker to use the NVIDIA Container Runtime.
4-Docker-2. Restart Docker daemon
Restart the Docker daemon to apply the changed settings.
1
systemctl --user restart docker
4-Docker-3. Configure /etc/nvidia-container-runtime/config.toml with sudo nvidia-ctk command
1
sudo nvidia-ctk config --set nvidia-container-cli.no-cgroups --in-place
Verify the Configuration
Run a sample CUDA container to test.
For Podman users, run:
1
podman run --rm --device nvidia.com/gpu=all --security-opt=label=disable ubuntu nvidia-smi
For Docker users, run:
1
docker run --rm --runtime=nvidia --gpus all ubuntu nvidia-smi
If you see output similar to the following, the configuration is successful:
1
2
3
4
5
6
7
8
9
10
11
12
13
14
15
16
17
18
19
+-----------------------------------------------------------------------------------------+
| NVIDIA-SMI 555.58.02              Driver Version: 555.58.02      CUDA Version: 12.5     |
|-----------------------------------------+------------------------+----------------------+
| GPU  Name                 Persistence-M | Bus-Id          Disp.A | Volatile Uncorr. ECC |
| Fan  Temp   Perf          Pwr:Usage/Cap |           Memory-Usage | GPU-Util  Compute M. |
|                                         |                        |               MIG M. |
|=========================================+========================+======================|
|   0  NVIDIA GeForce RTX 3090        Off |   00000000:01:00.0  On |                  N/A |
|  0%   46C    P8             29W /  350W |     460MiB /  24576MiB |      2%      Default |
|                                         |                        |                  N/A |
+-----------------------------------------+------------------------+----------------------+

+-----------------------------------------------------------------------------------------+
| Processes:                                                                              |
|  GPU   GI   CI        PID   Type   Process name                              GPU Memory |
|        ID   ID                                                               Usage      |
|=========================================================================================|
|  No running processes found                                                             |
+-----------------------------------------------------------------------------------------+
5. Writing Dockerfile
We’ll write a Dockerfile for our development environment based on CUDA and cuDNN images provided by the nvidia/cuda repository on Docker Hub.
- You need to choose an image considering the CUDA and cuDNN versions you need, as well as the Linux distribution type and version.
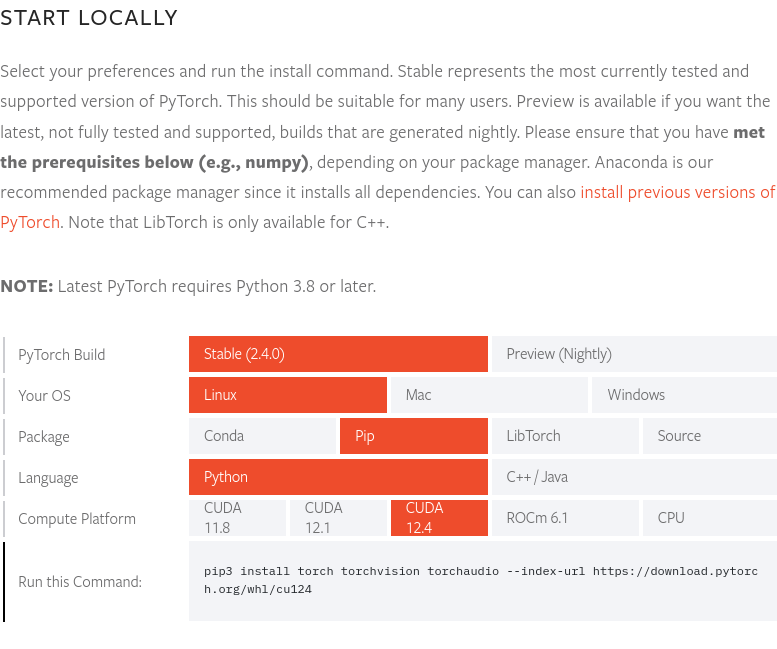 As of late August 12024 when this post was written, PyTorch version 2.4.0 supports CUDA 12.4. Therefore, we’ll use the 12.4.1-cudnn-devel-ubuntu22.04 image. You can check the latest PyTorch version and supported CUDA versions on the PyTorch website.
The complete Dockerfile source is available in the yunseo-kim/dl-env-docker GitHub repository. Below, I explain the process of writing this Dockerfile step by step.
5-1. Specify base image
1
FROM nvidia/cuda:12.4.1-cudnn-devel-ubuntu22.04
5-2. Install basic utilities and Python prerequisites
1
2
3
4
5
6
7
8
9
10
11
12
13
14
# Install basic utilities and Python-related packages, gosu, and SSH server
RUN apt-get update -y && apt-get install -y --no-install-recommends \
    apt-utils \
    curl \
    gosu \
    openssh-server \
    python3 \
    python-is-python3 \
    python3-pip \
    ssh \
    tmux \
    && rm -rf /var/lib/apt/lists/* \
# verify that the binary works
    && gosu nobody true
5-3. Set system timezone (using ‘Asia/Seoul’ in this post)
1
2
3
# Set up time zone
ARG TZ="Asia/Seoul"  # If necessary, replace it with a value that works for you.
RUN ln -snf /usr/share/zoneinfo/$TZ /etc/localtime && echo $TZ > /etc/timezone
5-4. Configure SSH server for remote access
Configure the SSH server to prevent root login for security.
1
2
3
4
# Set up SSH server
RUN mkdir /var/run/sshd
RUN echo "PermitRootLogin no" >> /etc/ssh/sshd_config && \
    echo "PasswordAuthentication yes" >> /etc/ssh/sshd_config
Create a non-root user named ‘remote’ for SSH access.
1
2
3
4
5
6
7
8
9
10
11
12
13
14
# Create remote user (password can be passed to --build-arg at build time)
#
# This default password is very weak. Make sure to change it to your own unique
# password string!
#
# This Dockerfile assumes that the built image will only be used by yourself or
# a small group of trusted insiders, and if you need to distribute the image
# without exposing sensitive information, using --build-arg is dangerous.
# See the official Docker documentation.
ARG USER_NAME="remote"
ARG USER_PASSWORD="000000"
ARG HOME_DIR="/home/$USER_NAME"
RUN useradd --create-home --home-dir $HOME_DIR --shell /bin/bash $USER_NAME \
    && echo "$USER_NAME:$USER_PASSWORD" | chpasswd
When building a Docker image using this Dockerfile without specifying options, the initial password for the ‘remote’ user is 000000. This is very vulnerable from a security perspective, so you should either specify a different account login password using the
--build-argoption when building the Docker image, or change the settings immediately after running the container for the first time. For security, it’s advisable to disable password login for SSH access and allow login only through a separate key file, and using hardware keys like Yubikey would be ideal. SSH server configuration will be covered to some extent in the next part of this series, and for more details, you can refer to the following documents:
Also, this Dockerfile assumes that the built image will only be used by yourself or a small group of trusted insiders, and if you need to distribute the image without exposing sensitive information, using
--build-argis dangerous. Please refer to this document.
5-5. Install setuptools, pip and register PATH environment variable
1
2
3
4
5
6
7
8
# Switch to remote user
ENV USER_NAME="$USER_NAME"
USER $USER_NAME
WORKDIR $HOME_DIR

# Install pip and ml/dl related packages
RUN python3 -m pip install -U setuptools pip
ENV PATH="$HOME_DIR/.local/bin:$PATH"
5-6. Install machine learning and deep learning packages for the development environment
1
2
3
4
RUN python3 -m pip install -U \
        jupyterlab numpy scipy pandas matplotlib seaborn[stats] scikit-learn tqdm \
    && python3 -m pip install -U torch torchvision torchaudio \
        --index-url https://download.pytorch.org/whl/cu124
If you want to use Cupy, cuDF, cuML, and DALI, add the following to your Dockerfile:
1
2
3
RUN python3 -m pip install -U cupy-cuda12x \
    && python3 -m pip install -U --extra-index-url=https://pypi.nvidia.com \
        cudf-cu12==24.8.* cuml-cu12==24.8.* nvidia-dali-cuda120
5-7. Create a directory to use as workspace
1
2
3
# Create a workspace directory to locate jupyter notebooks and .py files
ENV WORK_DIR="$HOME_DIR/workspace"
RUN mkdir -p $WORK_DIR
5-8. Open ports and set ENTRYPOINT to run when container starts
Open ports 22 and 8888 for SSH and Jupyter Lab access.
Also, to automatically run the SSH daemon when the container starts, root privileges are needed, so we’ll use the following method:
- Log in as root when the container starts
- Run the
/entrypoint.shscript immediately after container start - Start the SSH service in the script, then switch to the remote account using
gosu - If no separate command is specified when running the container, run Jupyter Lab as the remote account (non-root privileges) by default
Generally, using
sudoorsuinside Docker or Podman containers is not recommended, and if root privileges are needed, it’s better to start the container as root, perform tasks that require root privileges, and then switch to a non-root user usinggosuas explained here. The reasons for this are detailed in the following resources, which may be helpful if needed:
First, add the following content to the end of your Dockerfile:
1
2
3
4
5
6
7
8
9
# Expose SSH and Jupyter Lab ports
EXPOSE 22 8888

# Switch to root
USER root

# Copy the entry point script and grant permission to run it
COPY --chmod=755 entrypoint.sh /entrypoint.sh
ENTRYPOINT ["/entrypoint.sh"]
Next, create a script file named entrypoint.sh in the same path as your Dockerfile with the following content:
1
2
3
4
5
6
7
8
9
10
11
12
13
14
15
#!/bin/bash
set -e

# Run SSH daemon in the background
service ssh start

# Move to the workspace directory and run Jupyter Lab
cd "$WORK_DIR"
if [ $# -gt 0 ];then
    #su ${USER_NAME} -c "exec $@"
    exec gosu ${USER_NAME} $@
else
    #su ${USER_NAME} -c "exec jupyter lab --no-browser --autoreload --ip=0.0.0.0 --notebook-dir="${WORK_DIR}""
    exec gosu ${USER_NAME} jupyter lab --no-browser --autoreload --ip=0.0.0.0 --notebook-dir="${WORK_DIR}"
fi
6. Building Docker Image and Running Container
6-1. Build Image
Open a terminal in the directory where your Dockerfile is located and run the following command:
1
2
docker build -t dl-env:cuda12.4.1-cudnn9.1.0-ubuntu22.04 -f ./Dockerfile . \
--build-arg USER_PASSWORD=<password>
Replace <password> with the login password you want to use for SSH access.
6-2. Run Sample Workload
After building, run a disposable container to verify it works properly.
For Podman, run:
1
2
3
podman run -itd --rm --name test-container --device nvidia.com/gpu=all \
--security-opt=label=disable -p 22:22 -p 88:8888 \
dl-env:cuda12.4.1-cudnn9.1.0-ubuntu22.04
For Docker, run:
1
2
3
docker run -itd --rm --name test-container \
--gpus all -p 22:22 -p 88:8888 \
dl-env:cuda12.4.1-cudnn9.1.0-ubuntu22.04
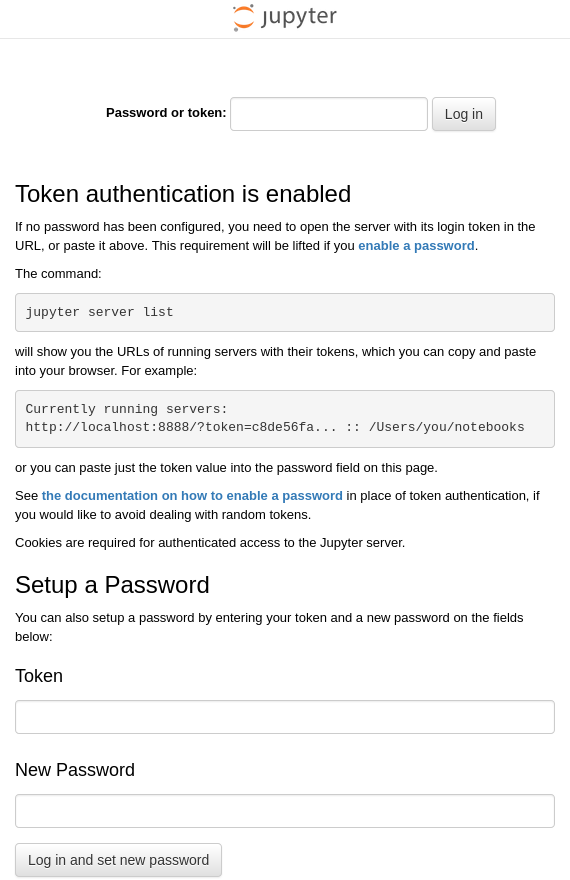
Entering the above command in the terminal will run a container named test-container from the previously built dl-env:cuda12.4.1-cudnn9.1.0-ubuntu22.04 image, connecting port 22 of the host system to port 22 of the container, and port 88 of the host system to port 8888 of the container. If the Docker image was built correctly in the previous step and the container started without issues, JupyterLab should be running inside the test-container at the default address http:127.0.0.1:8888. Therefore, when you open a browser on the host system where the Docker Engine is running and access http://127.0.0.1:88, it should connect to the http://127.0.0.1:8888 address inside the container and display a screen like the one below.
Open a terminal on the host system and run the command ssh [email protected] to remotely log in to the remote account of the Ubuntu system running inside the container.
When logging in for the first time, you’ll get a warning that there’s no information about the target’s encryption key and authentication is not possible, and it will ask if you want to continue connecting. Enter “yes” to proceed.
Then enter the password (if you didn’t change it during image building, it will be the default “000000”) to log in.
1
2
3
4
5
6
7
8
9
10
11
12
13
14
15
16
17
18
19
20
21
22
23
24
25
$ ssh [email protected]
The authenticity of host '127.0.0.1 (127.0.0.1)' can't be established.
ED25519 key fingerprint is {fingerprint (each key has its own unique value)}.
This key is not known by any other names.
Are you sure you want to continue connecting (yes/no/[fingerprint])? yes
Warning: Permanently added '127.0.0.1' (ED25519) to the list of known hosts.
[email protected]'s password:
Welcome to Ubuntu 22.04.4 LTS (GNU/Linux 6.12.11-200.fc41.x86_64 x86_64)

 * Documentation:  https://help.ubuntu.com
 * Management:     https://landscape.canonical.com
 * Support:        https://ubuntu.com/pro

This system has been minimized by removing packages and content that are
not required on a system that users do not log into.

To restore this content, you can run the 'unminimize' command.

The programs included with the Ubuntu system are free software;
the exact distribution terms for each program are described in the
individual files in /usr/share/doc/*/copyright.

Ubuntu comes with ABSOLUTELY NO WARRANTY, to the extent permitted by
applicable law.
If you see output similar to the above, you’ve successfully logged in remotely via SSH. To end the session, enter the exit command.
6-3. (optional) Push to Docker Hub
To be able to pull and use the development environment image you created whenever needed, it’s good to push the built image to Docker Hub.
To push your image to Docker Hub, you need your own Docker account. If you don’t have one yet, complete the registration at https://app.docker.com/signup first.
6-3-1. Log in to Docker Hub
For Podman
1
podman login docker.io
For Docker
1
docker login
6-3-2. Tag the image
Fill in your own details for <dockerhub_username>, <repository_name>, and (optional) :TAG.
e.g. “yunseokim”, “dl-env”, “rapids-cuda12.4.1-cudnn9.1.0-ubuntu22.04”
For Podman
1
podman tag IMAGE_ID docker.io/<dockerhub_username>/<repository_name>[:TAG]
For Docker
1
docker tag IMAGE_ID <dockerhub_username>/<repository_name>[:TAG]
6-3-3. Push the image
Finally, run the command below to push the image to Docker Hub.
For Podman
1
podman push docker.io/<dockerhub_username>/<repository_name>[:TAG]
For Docker
1
docker push <dockerhub_username>/<repository_name>[:TAG]
You can verify that it was pushed successfully at https://hub.docker.com/ as shown below.
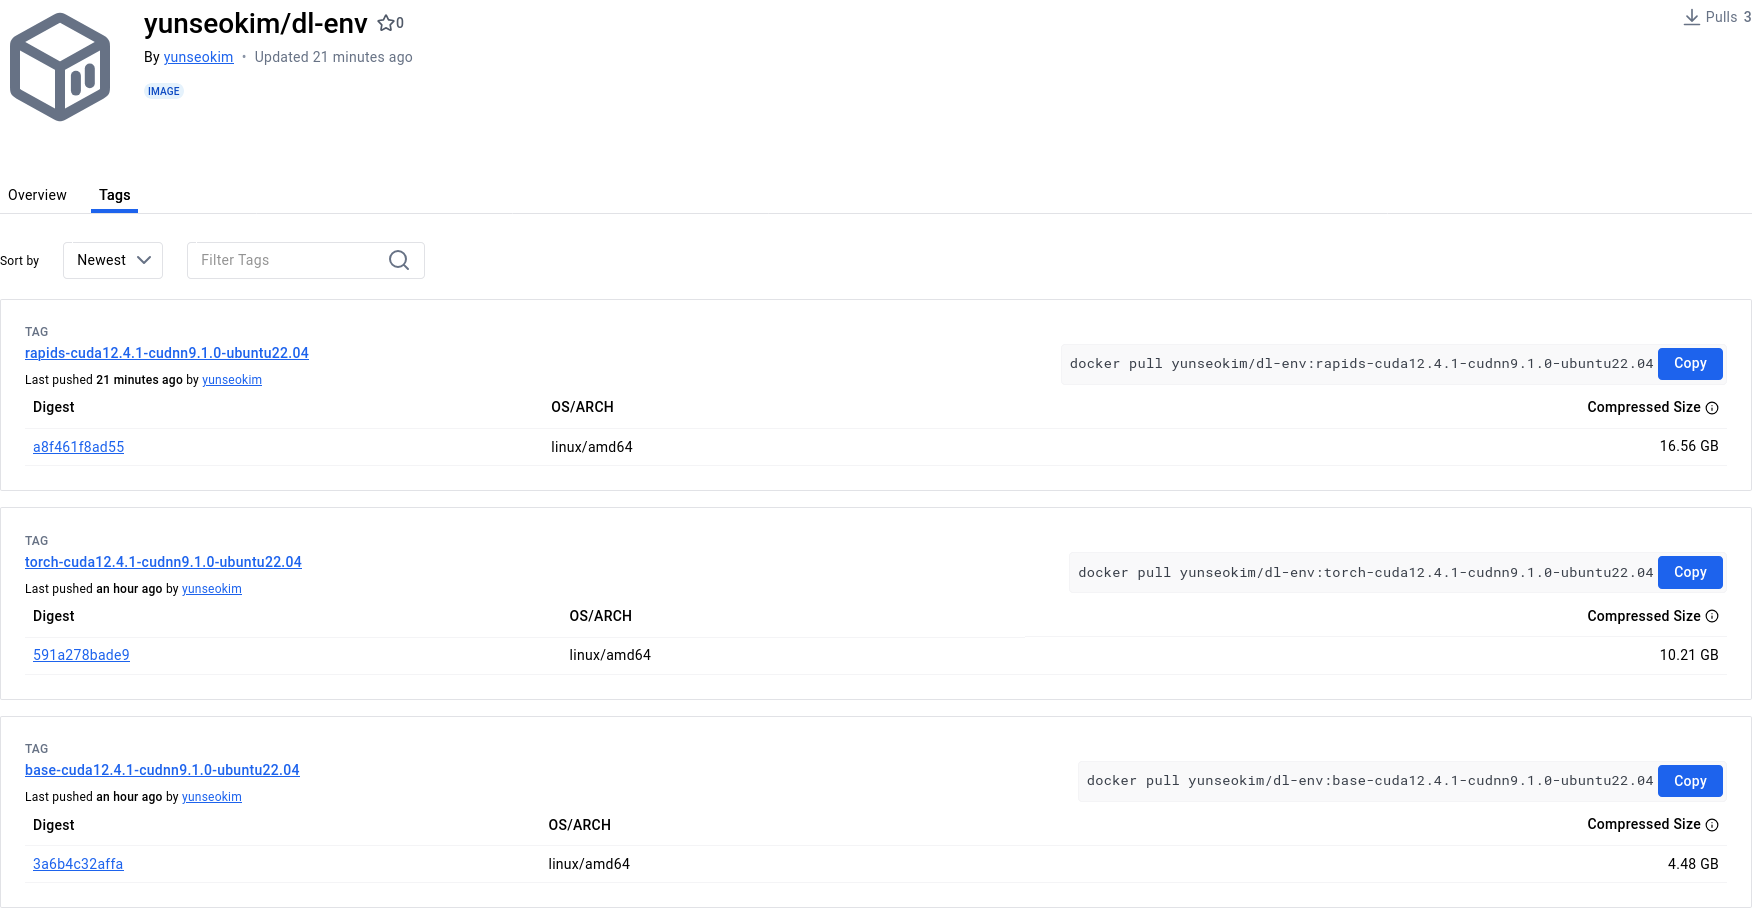
The image completed through the above process has been made public in the yunseokim/dl-env public repository on Docker Hub, and anyone can use it freely.
To pull the image, just change the push part to pull in the command you used earlier for pushing.