Building a Machine Learning Development Environment
This post covers how to set up a development environment, which is the first step for studying machine learning on a local machine. All content is based on Ubuntu 20.04 LTS with an NVIDIA Geforce RTX 3070 graphics card.

Overview
This post covers how to set up a development environment, which is the first step for studying machine learning on a local machine. All content is based on Ubuntu 20.04 LTS with an NVIDIA Geforce RTX 3070 graphics card.
- Technology stack to be built
- Ubuntu 20.04 LTS
- Python 3.8
- pip 21.0.1
- jupyter
- matplotlib
- numpy
- pandas
- scipy
- scikit-learn
- CUDA 11.0.3
- cuDNN 8.0.5
- Deep learning frameworks (it’s recommended to install only one per environment)
- PyTorch 1.7.1
- TensorFlow 2.4.0
Comparison with the newly written machine learning environment setup guide
Although it’s been about 3.5 years since this post was uploaded to the blog, most of the content is still valid except for some details like package versions and NVIDIA open-source driver releases. However, after purchasing a new PC and setting up a development environment in the summer of 12024 Holocene calendar, I wrote a new development environment setup guide with some changes. The differences are shown in the table below.
| Difference | This post (12021 version) | New post (12024 version) |
|---|---|---|
| Linux Distribution | Ubuntu-based | Applicable to Ubuntu, Fedora/RHEL/Centos, Debian, openSUSE/SLES, etc. |
| Development Environment Setup Method | Python virtual environment using venv | Container-based environment using NVIDIA Container Toolkit |
| NVIDIA Graphics Driver Installation | O | O |
| Direct Installation of CUDA and cuDNN on Host System | O (Using Apt package manager) | X (Using pre-installed images provided by NVIDIA from Docker Hub, so no direct work needed) |
| Portability | Need to rebuild development environment when moving to another system | Docker-based, so you can easily build new images with your prepared Dockerfile or port existing images (excluding additional volumes or network settings) |
| Additional GPU Acceleration Libraries Beyond cuDNN | X | Introducing CuPy, cuDF, cuML, DALI |
| Jupyter Notebook Interface | Jupyter Notebook (classic) | JupyterLab (Next-Generation) |
| SSH Server Configuration | Not covered | Basic SSH server configuration included in Part 3 |
If you want to use Python virtual environments like venv instead of Docker, this post is still valid, so feel free to continue reading. If you want to enjoy the benefits of Docker containers such as high portability, plan to use Linux distributions other than Ubuntu like Fedora, use an NVIDIA graphics card and want to utilize additional GPU acceleration libraries like CuPy, cuDF, cuML, DALI, or want to access remotely through SSH and JupyterLab settings, I recommend also referring to the new guide.
0. Prerequisites
- Linux is recommended for machine learning studies. While it’s possible on Windows, you may waste time on various minor issues. Using the latest LTS version of Ubuntu is the most straightforward option. It conveniently auto-installs proprietary drivers, and most technical documentation is written for Ubuntu due to its large user base.
- Python is typically pre-installed on most Linux distributions, including Ubuntu. However, if Python is not installed, you need to install it before following this guide.
- You can check the currently installed Python version with the following command:
1
$ python3 --version
- If you plan to use TensorFlow 2 or PyTorch, check the compatible Python versions. As of writing this post, the latest PyTorch version supports Python 3.6-3.8, and the latest TensorFlow 2 version supports Python 3.5-3.8.
This post uses Python 3.8.
- You can check the currently installed Python version with the following command:
- If you plan to study machine learning on a local machine, it’s good to have at least one GPU. While data preprocessing can be done with a CPU, the training speed difference between CPU and GPU becomes overwhelming as the model size increases (especially for deep learning).
- For machine learning, there’s essentially only one choice for GPU manufacturer: NVIDIA. NVIDIA has invested significantly in the machine learning field, and almost all machine learning frameworks use NVIDIA’s CUDA library.
- If you plan to use a GPU for machine learning, first check if your graphics card model supports CUDA. You can check your current GPU model name in the terminal with the command
uname -m && cat /etc/*release. Find the corresponding model name in the GPU list at this link and check the Compute Capability value. This value must be at least 3.5 for CUDA support. - GPU selection criteria are well summarized in the following article, which the author continuously updates:
Which GPU(s) to Get for Deep Learning
Another article by the same author, A Full Hardware Guide to Deep Learning, is also very informative. For reference, the conclusion of the above article is as follows:The RTX 3070 and RTX 3080 are mighty cards, but they lack a bit of memory. For many tasks, however, you do not need that amount of memory.
The RTX 3070 is perfect if you want to learn deep learning. This is so because the basic skills of training most architectures can be learned by just scaling them down a bit or using a bit smaller input images. If I would learn deep learning again, I would probably roll with one RTX 3070, or even multiple if I have the money to spare. The RTX 3080 is currently by far the most cost-efficient card and thus ideal for prototyping. For prototyping, you want the largest memory, which is still cheap. With prototyping, I mean here prototyping in any area: Research, competitive Kaggle, hacking ideas/models for a startup, experimenting with research code. For all these applications, the RTX 3080 is the best GPU.
If you meet all the requirements mentioned above, let’s start building the working environment.
1. Creating a Working Directory
Open a terminal and modify the .bashrc file to register environment variables (commands follow the $ prompt).
First, open the nano editor with the following command (vim or other editors are fine too):
1
$ nano ~/.bashrc
Add the following line at the end. You can change the path inside the quotes if you want:
export ML_PATH="$HOME/ml"
Press Ctrl+O to save and Ctrl+X to exit.
Now run the following command to apply the environment variable:
1
$ source ~/.bashrc
Create the directory:
1
$ mkdir -p $ML_PATH
2. Installing pip Package Manager
There are several ways to install the Python packages needed for machine learning. You can use scientific Python distributions like Anaconda (recommended for Windows operating systems) or use pip, Python’s own packaging tool. Here, we’ll use the pip command in the bash shell on Linux or macOS.
Check if pip is installed on your system with the following command:
1
2
3
4
5
6
$ pip3 --version

Command 'pip3' not found, but can be installed with:

sudo apt install python3-pip
If you see the above output, pip is not installed on your system. Install it using your system’s package manager (apt in this case) (if a version number appears, pip is already installed, so skip this command):
1
$ sudo apt install python3-pip
Now pip is installed on your system.
3. Creating an Independent Virtual Environment (Recommended)
To create a virtual environment (to avoid conflicts with library versions from other projects), install venv:
1
$ sudo apt install python3-venv
Then create an independent Python environment as follows. This is done to prevent conflicts between different library versions needed for different projects, so you should create a new virtual environment for each new project to establish an isolated environment:
1
2
$ cd $ML_PATH
$ python3 -m venv --system-site-packages ./(environment name)
To activate this virtual environment, open a terminal and enter the following commands:
1
2
$ cd $ML_PATH
$ source ./(environment name)/bin/activate
After activating the virtual environment, upgrade pip within the virtual environment:
1
(env) $ pip install -U pip
To deactivate the virtual environment later, use the deactivate command. When the environment is activated, any packages installed with the pip command will be installed in this isolated environment, and Python will use these packages.
3′. (If Not Creating a Virtual Environment) Upgrading pip Version
When installing pip on your system, you download and install a binary file from the distribution’s mirror server (Ubuntu in this case), which is often not the latest version due to delayed updates (in my case, version 20.3.4 was installed). To use the latest version of pip, run the following command to install (or upgrade if already installed) pip in your home directory:
1
2
3
4
5
$ python3 -m pip install -U pip

Collecting pip
(omitted)
Successfully installed pip-21.0.1
You can see that pip has been installed with version 21.0.1, which is the latest as of writing this post. Since pip installed in the user’s home directory is not automatically recognized by the system, you need to register it in the PATH environment variable so that the system can recognize and use it.
Open the .bashrc file with an editor again:
1
$ nano ~/.bashrc
This time, find the line starting with export PATH=. If there are no paths written after it, just add the content as in Step 1. If there are existing registered paths, add the content after them using a colon:
export PATH="$HOME/.local/bin"
export PATH="(existing path):$HOME/.local/bin"
Upgrading system pip by methods other than the system package manager can cause problems due to version conflicts. That’s why we install pip separately in the user’s home directory. For the same reason, it’s good to use the python3 -m pip command instead of the pip command to use pip when not in a virtual environment.
4. Installing Machine Learning Packages (jupyter, matplotlib, numpy, pandas, scipy, scikit-learn)
Install the necessary packages and all dependency-linked packages with the following pip command:
I’m using the pip command because I’m using venv, but if you’re not using venv, I recommend using the python3 -m pip command as mentioned earlier:
1
2
3
4
5
6
(env) $ pip install -U jupyter matplotlib numpy pandas scipy scikit-learn

Collecting jupyter
  Downloading jupyter-1.0.0-py2.py3-none-any.whl (2.7 kB)
Collecting matplotlib
(omitted)
If you’re using venv, register a kernel for Jupyter and name it:
1
(env) $ python3 -m ipykernel install --user --name=(kernel name)
From now on, you can run Jupyter with the following command:
1
(env) $ jupyter notebook
5. Installing CUDA & cuDNN
5-1. Checking Required CUDA & cuDNN Versions
Check the supported CUDA versions in the PyTorch official documentation:
For PyTorch version 1.7.1, the supported CUDA versions are 9.2, 10.1, 10.2, and 11.0. NVIDIA 30 series GPUs require CUDA 11, so we need version 11.0.
Also check the required CUDA version in the TensorFlow 2 official documentation:
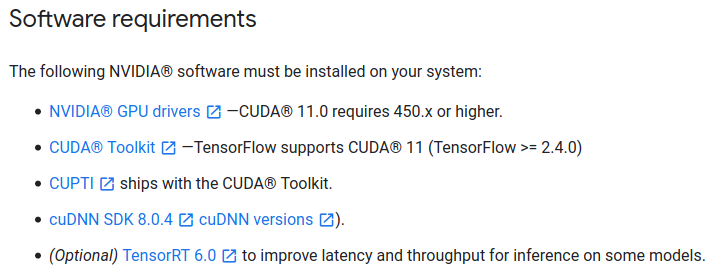
For TensorFlow version 2.4.0, CUDA version 11.0 and cuDNN version 8.0 are required.
I checked the CUDA versions compatible with both packages because I sometimes use PyTorch and sometimes TensorFlow 2. You should check the requirements of the packages you need and match accordingly.
5-2. Installing CUDA
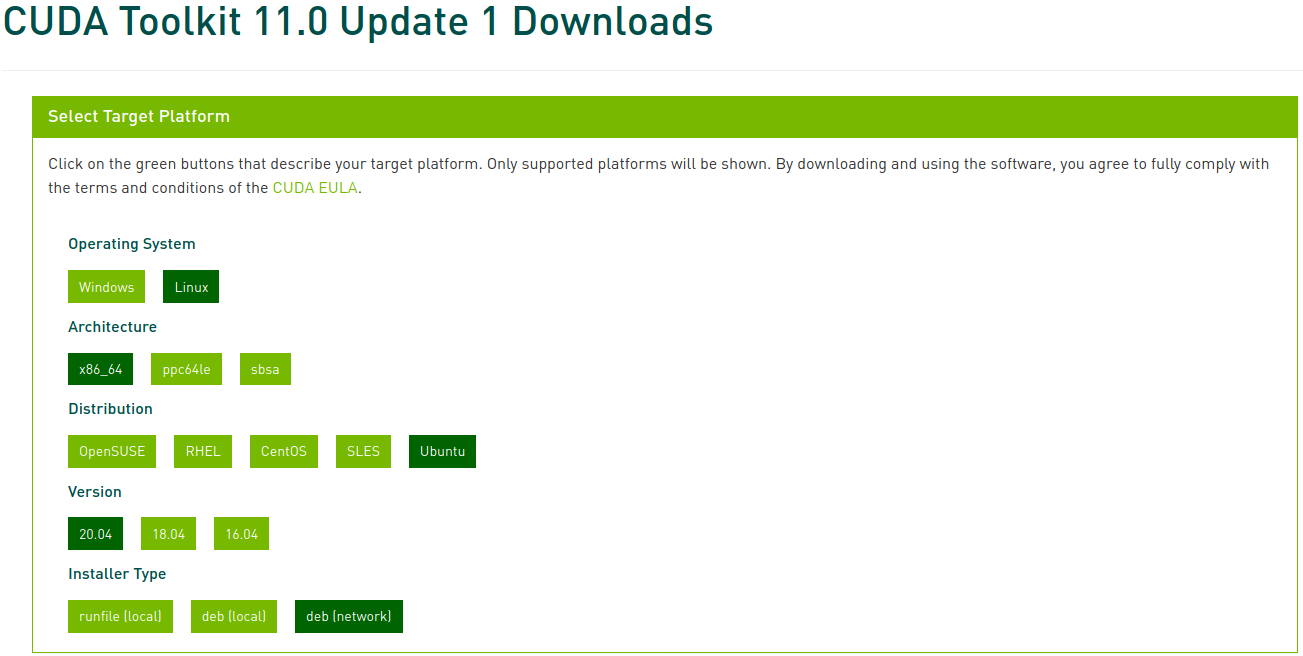
Go to the CUDA Toolkit Archive and select the version you confirmed earlier. In this post, we select CUDA Toolkit 11.0 Update1:
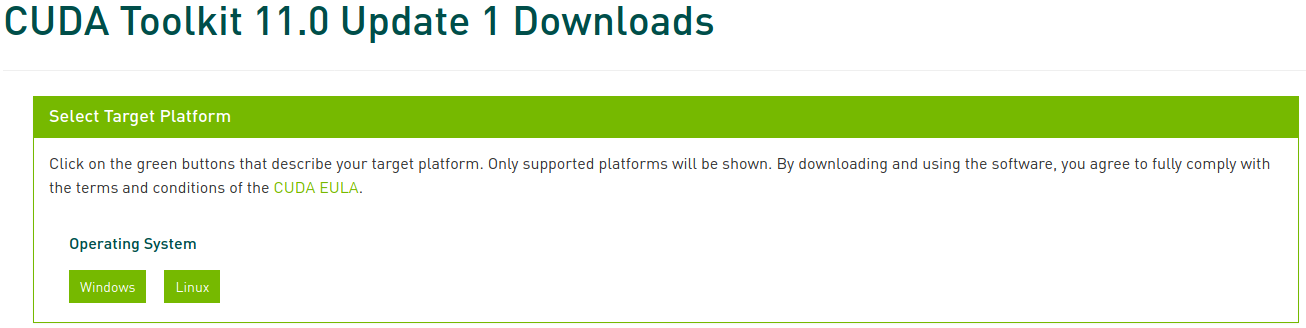
Now select the corresponding platform and installer type, and follow the instructions on the screen. It’s recommended to use the system package manager for the installer when possible. My preferred method is deb (network):
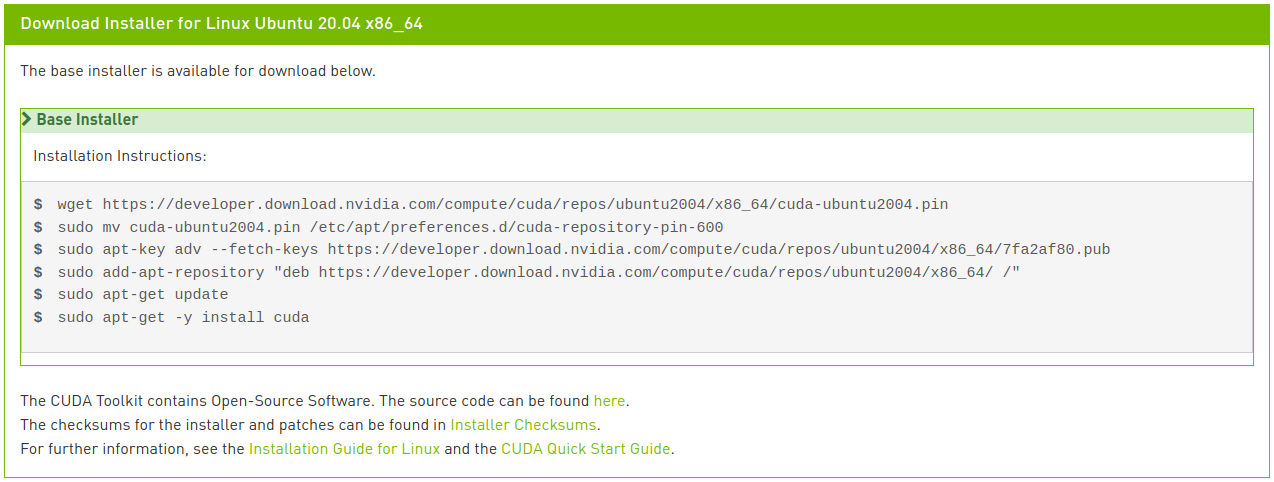
Run the following commands to install CUDA:
1
2
3
4
5
6
$ wget https://developer.download.nvidia.com/compute/cuda/repos/ubuntu2004/x86_64/cuda-ubuntu2004.pin
$ sudo mv cuda-ubuntu2004.pin /etc/apt/preferences.d/cuda-repository-pin-600
$ sudo apt-key adv --fetch-keys https://developer.download.nvidia.com/compute/cuda/repos/ubuntu2004/x86_64/7fa2af80.pub
$ sudo add-apt-repository "deb https://developer.download.nvidia.com/compute/cuda/repos/ubuntu2004/x86_64/ /"
$ sudo apt update
$ sudo apt install cuda-toolkit-11-0 cuda-drivers
If you’re observant, you’ll notice that the last line is slightly different from the instructions shown in the image. In the network installation, entering just cuda as shown in the image would install the latest version 11.2, which is not what we want. You can see various meta-package options in the CUDA 11.0 Linux Installation Guide. We modified the last line to specifically install the CUDA Toolkit package version 11.0 and allow the driver package to auto-upgrade.
5-3. Installing cuDNN
Install cuDNN as follows:
1
2
$ sudo apt install libcudnn8=8.0.5.39-1+cuda11.0
$ sudo apt install libcudnn8-dev=8.0.5.39-1+cuda11.0
6. Installing PyTorch
If you created a virtual environment in step 3, proceed with the virtual environment activated. Skip this step if you don’t need PyTorch.
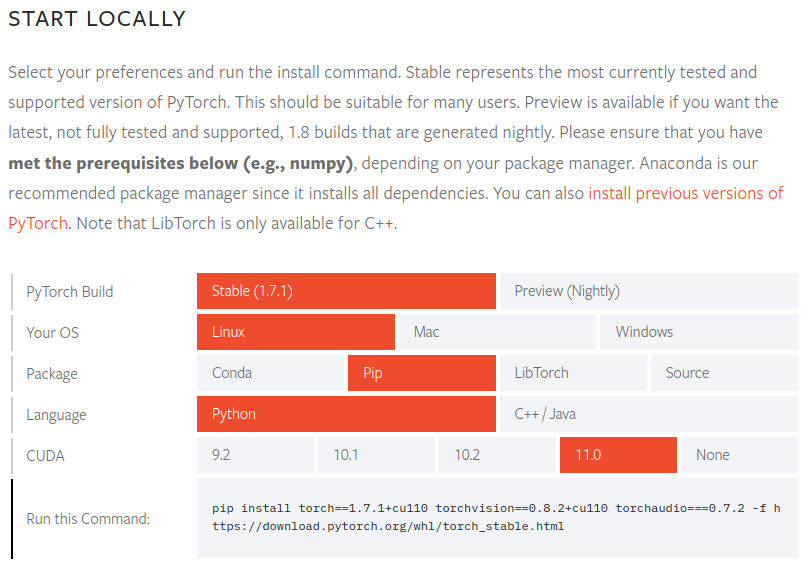
Go to the PyTorch website, select the PyTorch build (Stable), operating system (Linux), package (Pip), language (Python), CUDA (11.0), and follow the instructions on the screen:
1
(env) $ pip install torch==1.7.1+cu110 torchvision==0.8.2+cu110 torchaudio===0.7.2 -f https://download.pytorch.org/whl/torch_stable.html
To verify that PyTorch is properly installed, run the following commands after launching the Python interpreter. If a tensor is returned, the installation was successful:
1
2
3
4
5
6
7
8
9
10
11
12
(env) $ python3
Python 3.8.5 (default, Jul 28 2020, 12:59:40)
[GCC 9.3.0] on linux
Type "help", "copyright", "credits" or "license" for more information.
>>> import torch
>>> x = torch.rand(5, 3)
>>> print(x)"
tensor([[0.8187, 0.5925, 0.2768],
        [0.9884, 0.8298, 0.8553],
        [0.6350, 0.7243, 0.2323],
        [0.9205, 0.9239, 0.9065],
        [0.2424, 0.1018, 0.3426]])
To check if the GPU driver and CUDA are activated and available, run the following command:
1
2
>>> torch.cuda.is_available()
True
7. Installing TensorFlow 2
Skip this step if you don’t need TensorFlow.
If you installed PyTorch in a virtual environment in step 6, deactivate that environment, go back to steps 3 and 4 to create and activate a new virtual environment, and then proceed. If you skipped step 6, just continue.
Install TensorFlow as follows:
1
(env2) $ pip install --upgrade tensorflow
To verify that TensorFlow is properly installed, run the following command. If it displays the GPU name and returns a tensor, the installation was successful:
1
2
3
4
5
6
(env2) $ python -c "import tensorflow as tf;print(tf.reduce_sum(tf.random.normal([1000, 1000])))"

2021-02-07 22:45:51.390640: I tensorflow/stream_executor/platform/default/dso_loader.cc:49] Successfully opened dynamic library libcudart.so.11.0
(omitted)
2021-02-07 22:45:54.592749: I tensorflow/core/common_runtime/gpu/gpu_device.cc:1406] Created TensorFlow device (/job:localhost/replica:0/task:0/device:GPU:0 with 6878 MB memory) -> physical GPU (device: 0, name: GeForce RTX 3070, pci bus id: 0000:01:00.0, compute capability: 8.6)
tf.Tensor(526.1059, shape=(), dtype=float32)